Service Guide

How to Get the Most Out of Mikihands

A step-by-step guide centered on writing—connecting your ideas to structure, translation, SEO, and domains.

Tip: Feel free to skip ahead—just read the sections you need.

Quick Start (10 minutes)

A simple path that takes even new users smoothly to publishing their first post.

01
Create a blog
Choose your blog domain during signup and create your blog.
02
Basic settings
Start by setting up basics like your blog title, description, translation languages, and logo.
03
Write a draft
Start writing directly in the editor. Use AI only as a helper when needed.
04
Review & structure
Organize topics, internal links, metadata, and glossary, then review once more in draft.
05
Publish
Publish once it’s ready. Translation will be triggered automatically upon publishing.
Important

Translation starts immediately after publishing a new post. It’s recommended to save as a draft, review thoroughly, and then publish.

Recommended Workflow

You focus on the joy of writing—Mikihands takes care of the rest. That’s how we work best.

WRITE
Start with a draft.
  • • Begin by outlining your title, main idea, and header structure.
  • • Even rough notes are fine—focus on getting the flow down first.
SHAPE
Bring in AI when you need a hand.
  • • Use polishing or feedback when you get stuck on a sentence.
  • • Leverage AI actively for generating metadata.
STRUCTURE
Add topics and links.
  • • Organize topics and internal links before publishing.
  • • Link related posts and concepts early to build a stronger hub structure.
PUBLISH
Review, then publish.
  • • Translation starts automatically when you publish.
  • • You can still revert changes anytime from History after publishing.

Editor Features

The editor is more than just an input box—it's a workspace where writing, structuring, translation prep, and internal linking all come together.

Editor Toolbar Guide
1 ~ 9, 14: Basic Editing Tools

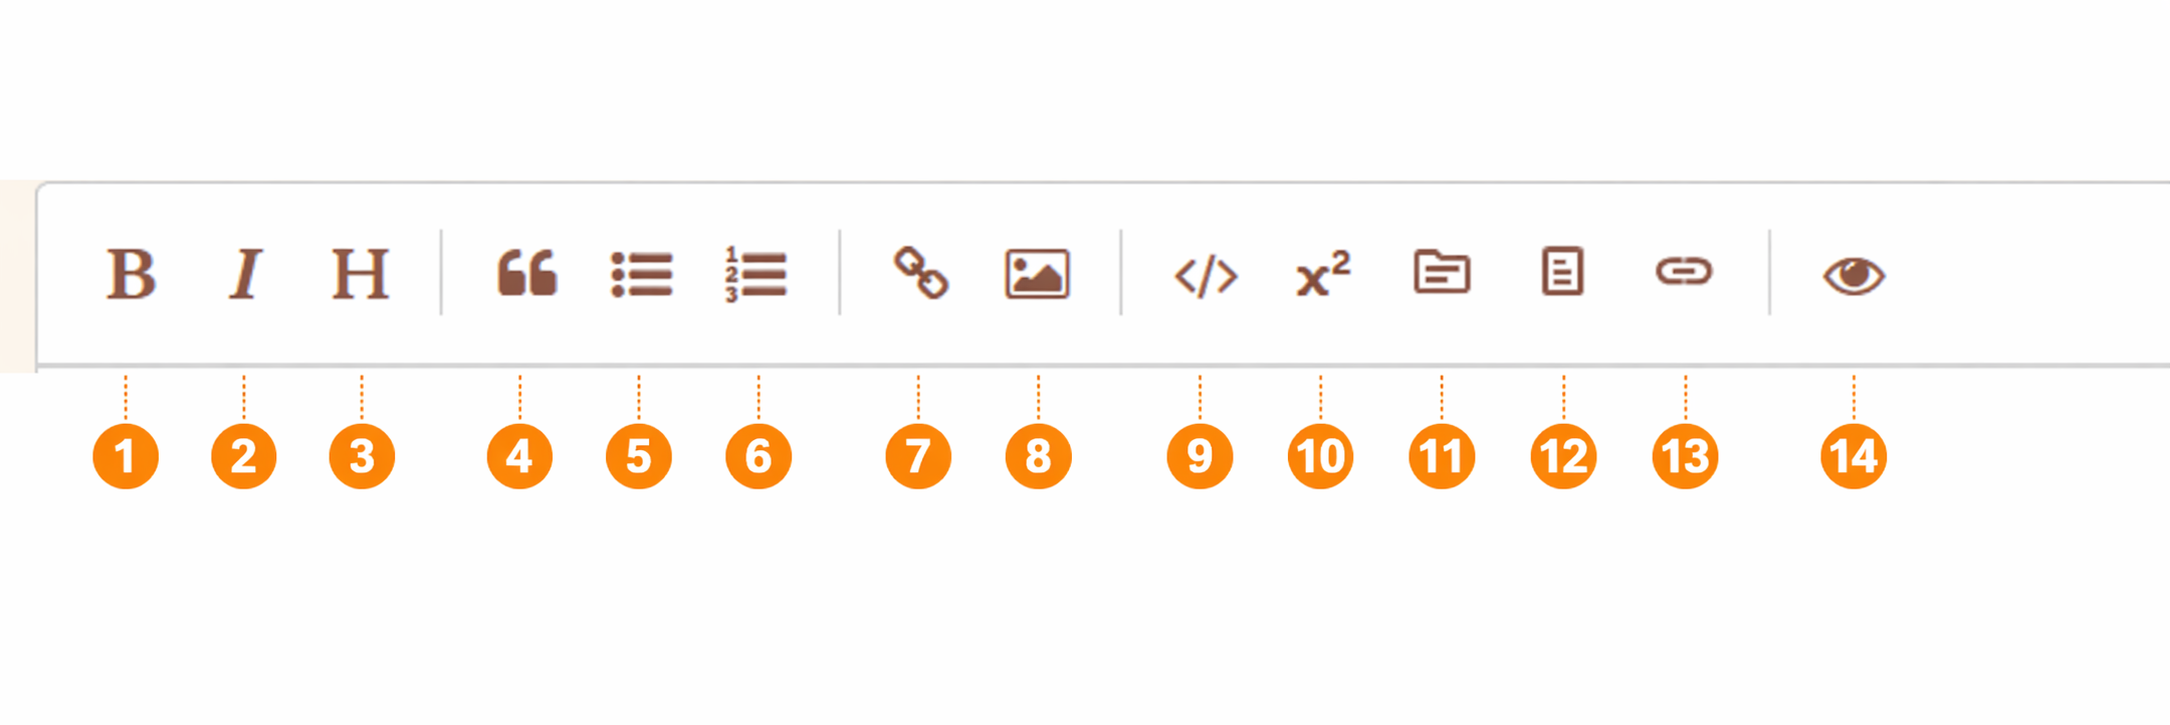
These are basic tools like Bold, Italic, Headers, Quotes, Lists, Links, Images, Code, and Preview. They are designed to be intuitive.

The Preview tool (#14) is for checking the rendered state while writing. Since it isn't 100% identical to the live page, we recommend a final check using the "Draft Preview" before publishing.

10

Adding Footnotes

Use footnotes to add sources or supplementary details without breaking the flow of your text. This is especially useful for technical posts or link-heavy content.

11

Topic Settings

Topics are vital in Mikihands. You can drag keywords to connect core concepts of your post directly to topics.

If you have expanding concepts, it’s best to set topics before publishing. Doing so ensures topic links are automatically applied to all translations. Post-publish topic settings only apply to the current language, requiring manual updates for other versions.

This behavior is by design, as some users prefer to keep specific links limited to certain languages.

12

Glossary Settings

This feature allows you to pre-define how specific terms or phrases should be translated for each target language.

We highly recommend using this for more natural translations. You can also reload previously saved settings.

13

Connecting Internal Links

This feature lets you search for and insert links to your past posts directly into your current draft.

It’s great for SEO or helping readers easily discover related content from your archive.

You can also trigger this by typing "$$" twice as a shortcut.

What is AI's role here?

Within the editor, AI isn't the lead writer—it’s a helper for when you're stuck and a tool for generating multilingual versions after publishing. We recommend using it for metadata generation to save significant time.

SEO & Content Structure

Search traffic doesn’t come from keywords alone. Structure, topic connections, and internal links need to work together.

HEADERS
Header-driven structure
  • • Outline the logical flow first using H2/H3 headings.
  • • Keep each post focused around a single core question.
TOPIC
Topic connections
  • • Grouping related concepts into topics helps posts grow into a hub structure.
  • • This makes it easier for both readers and search engines to understand the context.
META
Create metadata
  • • Using AI assistance for slugs, descriptions, and metadata is highly recommended.
  • • However, it’s best to refine the final wording yourself.

Plans and Translation

Translation is a core feature of Mikihands, but getting the best results depends on timing your publication and using the Glossary effectively.

Translation starts upon publication

When you publish a new post, translation is automatically triggered. Therefore, if your sentences or structure are still being refined, we recommend saving it as a draft and reviewing it thoroughly before publishing.

Make active use of the Glossary

Setting language-specific standards for brand names, technical terms, and recurring expressions through the Glossary results in much more natural translations.

Curious about the differences between plans?

Features such as the number of translation languages and custom domains vary depending on your plan.

View plan details →

Connecting a Custom Domain

Premium users can move beyond the default platform address and run their blog on a domain they personally own.

Custom domain settings screen

Setup Summary

  • • Purchase a domain from a provider like Cloudflare or Squarespace.
  • • Follow the instructions on the settings screen to enter your apex / subdomain DNS records.
  • • Once the connection is complete, you can start running your blog under your own branded URL.

Security & Operational Notes

Since publishing automatically triggers translation, a final review by the author is essential.

Pre-publish review

As translation begins upon publishing, it’s best to review sentences, topics, links, and metadata beforehand.

Review AI outputs

Facts, timeliness, copyright, and citations should always be verified by a human.

Domain management

When connecting a custom domain, ensure DNS settings are entered correctly, and review proxy/CDN options beforehand.

Troubleshooting

Key points are summarized to help you quickly resolve common issues.

Q. I want to revert my changes to the post.

In History, you can select a previous revision to compare and revert if needed. Both drafts and published edits are versioned, making experimental changes relatively safe.

History and diff management
1
Compare mode

Select two revisions to enable diff comparison. This is especially useful for comparing the current version with a previous one.

2
Preview

You can preview how that revision will appear on the actual page.

3
RAW

View the original markdown at that point in time. Useful for checking sentence-level or structural differences.

4
Undo

Revert to the selected revision. Helpful for quickly restoring changes if you’re not satisfied.

Q. The translation doesn’t feel right.

First, check your glossary. Defining commonly used terms and expressions in advance makes translations much more natural.

Even after translation is generated, you can refine it using the AI polishing feature.

Polishing button UI
For developers

Connect content operations to your system

Beyond a simple blog UI, Mikihands allows you to integrate post creation, editing, and publishing into other services or automated workflows via authentication and API flows.

Example Workflow
Create → Update → Publish
# Api-Key / HMAC signed requests
# POST /api/blogcontroller/posts/
{'{ "title":"...", "slug":"...", "meta_description":"...", "body":"..." }'}

Gently bring out the joy of writing from within.
Shall we start a pleasant journey with Mikihands today?

The desire to write is already within you. Mikihands is just here to blow a gentle breeze and help that spark catch fire.